
Initial Connectivity Setup & Antenna Verification
To start, we will be placing the Outdoor metro cell inside near a window and next to your network gear to confirm a set of preliminary checks. This validates that things are working before the outdoor metro cell is deployed to its permanent location where it may be difficult to access.
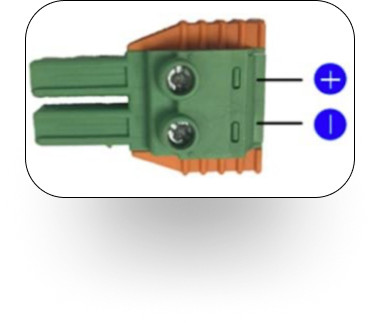
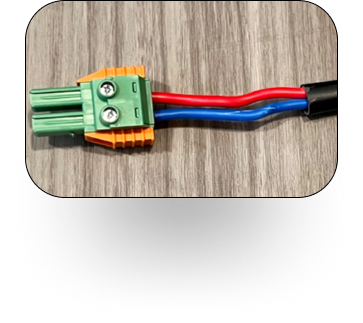
Step 1: Connect Power Terminal
Connect the power terminal to the positive and negative leads coming from your power supply. The colors may differ depending on your shipment, look at the label on the power supply to determine + and – wires. Connect per the guide image below.
Step 2: Open the weather door to expose power and ethernet ports
Open the weather sealed door using an allen wrench to expose the power and ethernet connections for the radio.
Step 3: Connect Power and Ethernet cables to the Radio
Connect an outdoor rated ethernet cable to the port labeled “DATA/MGMT ETH”. Connect the Power Terminal to the power port. Screws on the power terminal should be facing the inside of the compartment. Depending on the location of your nearest power outlet, you may need to extend the power cables. The length of this cable should be long enough to reach the permanent location where you want to deploy the metro cell. Ethernet cables may be up to 100m/330ft.
Here is an example: Outdoor Rated Cable
Warning!
If your outlet for your radio is outdoors, ensure the power adaptor for the radio is placed inside of a waterproof enclosure. If your outlet is indoors, ensure that no water is able to travel along the wires and make its way inside. Water damage due to improper installation is not covered under warranty.
Step 4: Connect the Ethernet cable to the Gateway
Connect the other end of the ethernet cable to the port labeled eNB1 the FreedomFi Gateway. Two additional CBRS small cells are supported on the eNB2 and eNB3 ports.
For now, don’t worry about the location of the outdoor metro cell. We will be moving the outdoor metro cell to a permanent location at a later point, but we want to connect the cable inside to make sure things are working.
Step 5: Verify Connectivity status
Visit your small cell dashboard by utilizing the Official Helium Dashboard and select the gateway this radio is currently attached to. From here, scroll down to this gateways “Attached Radios” and verify you can see your new radio listed.
Note: It is normal for Spectrum Status & On Air statuses to be “Trying” prior to your radio registration submission and approval.
Antenna Verification
The antennas that are utilized for the Outdoor metro cell must be verified & approved to work with our SAS. The best way to ensure no issues is to simply utilize a preverified antenna that already exists within our system, please see below the list of already pre-approved antennas.
Approved Antennas:
KP Performance 8 Dbi (KP-3QOMNI-8)
KP Performance 15.5 DBi (KP-3DP120S-45)
KP Performance 17 DBi (KP-3SX4-90)
KP Performance 11-12 DBi (KP-35DOMNI-HV)
KP Performance 16.7 DBi (KPPA-3GHZDP90S-45)
KP Performance 13 DBi (KPPA-3GHZ-DPOMA)
KP Performance 18 DBi (KP-3DP65S-45)
KP Performance 17/17.8 DBi (KPP-3S65-5S90-X4)
KP Performance 18.1 DBi (KPP-3SX4-65)
Alpha Wireless 18 DBi (AW3161)
Alpha Wireless (AW3677)
Rak Wireless 10 DBi (RAKARG22)
Any antenna that is not a part of this list, is not approved and will need to go through the verification and addition process to our system. We are happy to assist in these situations and ask for you to please generate a ticket with our support team here.
However please do note, that new antenna reviews can take up to ~2-3 months before being approved and officially added to the list of pre-approved antennas.
Outdoor Metro Cell Install & Registration
To start, make sure you select a good place for the Outdoor metro cell. Obstructions will decrease coverage. CBRS signals have less range than LoRa. Similar to Wi-Fi they can be weakened or blocked by obstacles like walls, trees, and buildings. To capture the most data you can, you want your small cell to point towards a populated area, a place with a lot of people and phones e.g. a park, a playground, an outdoor cafe/coffee shop.
For the purpose of improved coverage area, it is recommended to mount your outdoor small cell as high up as reasonably possible. This often means on a roof, or near the roof line of a building. Roof mounting examples for a home or small business:
Angled Roof: J-Bar mounted to the facia
Note: The outdoor metro cell will require installation CPI approval before it can go on air and allow users to connect.
The CPI process requires the following:
Installation parameters must be shared with FreedomFi to get CPI approval
Height with 2 to 4 photos to document accuracy
Azimuth angle with 1 photo to document accuracy
Elevation angle with 1 photo to document accuracy
Antenna model plate photo
Antenna installation photo
Note: How to get and submit this information along with sample photos will be covered in the metro cell registration section below.Metro Cell Registration
To enable the outdoor metro cell, you’ll need to complete the CPI flow and get approval. The process starts with registering the small cell location.
To register the outdoor small cell, you’ll need the following information along with photos to prove it.
Height
Azimuth Angle
Elevation Angle
Antenna Badge
Street Address of installation
Step 6: Recording your Radio Height
You will be required to submit the height of the installation and a photo to verify it. Here are some ideas on how to get the height:
Ask a contractor or building manager about the height of your roof.
Get the height of the home/building by looking at it in Google Earth Pro.
Please follow the steps here.
Use a tape measure and measure the height directly from the top of your roof
Take a photo that shows the radio and the ground. Sample Verification photo:
Warning!
Height photos must be taken from the Radio/Antenna after the installation has already been completed and the unit is in its final position. Applications with photos of measurements taken on the ground will be rejected.
Step 7: Recording your Radio Azimuth Angle
Azimuth is a fancy name for the compass direction in which the center of the antenna is pointing. Please utilize the free NOAA Mobile Magnetic Declination calculator for this measurement.
Navigate to the NOAA website to get a compass up NOAA Mobile Magnetic Declination Calculator
Important! Ensure you allow NOAA to utilize your device location to ensure an accurate declination reading.
Choose the “Compass” option in the lower-left corner
Important! Place the phone on top of the antenna that is connected to your 436H Metro Cell, so the TOP of the phone (the part that goes to your ear on a phone call) is pointing in the same direction as the antenna.
Take a picture of the compass direction
The sample picture is showing azimuth angle of 176 degree (0 Declination.
Warning!
CPI submissions utilizing any apps/tools other than the NOAA Mobile Magnetic Declination to calculate the Azimuth or CPI submissions with location services disabled on NOAA will be rejected.
CPI submissions measuring their azimuth from their 436H Metro Cell instead of from the connected antenna will be rejected.
Azimuth photos must be taken from the Radio/Antenna after the installation has already been completed and the unit is in its final position. Applications with photos of measurements taken on the ground will be rejected.
Step 8: Recording your Radio Elevation Angle
The elevation angle is a fancy name for “is it pointing up or down from level.” The reference point is the middle of the antenna. To ensure consistency across all applications, we ask that you please utilize the following free app to measure & record your elevation accurately.
Bubble Level
Steps to collect this photo:
Open the recommended app above on your device.
Place your phone directly on top of the antenna that is currently connected to your 436H Metro Cell.
Take a picture of the elevation angle
The sample image is showing 3 degrees of down-tilt angle using the Bubble Level app.
Warning!
CPI submissions utilizing any apps/tools other than the NOAA Mobile Magnetic Declination to calculate the Azimuth or CPI submissions with location services disabled on NOAA will be rejected.
CPI submissions measuring their azimuth from their 436H Metro Cell instead of from the connected antenna will be rejected. If you are utilizing an Omnidirectional antenna, ensure that your elevation angle is as close to as 0 as possible.
Elevation photos must be taken from the Radio/Antenna after the installation has already been completed and the unit is in its final position. Applications with photos of measurements taken on the ground will be rejected.
Step 9: Capture the Antenna Product Badge Photo
To verify the antenna model used, take a picture of the product badge on the unit. This should show the manufacturer and model number. Example photos below.
Step 10: Capture the overall Antenna photo
To verify the antenna installation, take a picture of the overall antenna in it is mounted location. Example photos below.
Step 11: Register your Radio
Now that you have the small cell information and photos, you will need to submit them for CPI approval. Access your small cell dashboard by heading to the Helium Dashboard:
Login to your Helium Dashboard
Scroll down to “Attached Radios”
If you have more than one radio connected, make sure the serial number matches the radio you are trying to register.
Click “Register Radio” in the bottom left corner
Follow the wizard to fill out the form and add photos
Submit the information
Wait for Approval

Step 12: Verify your Radio is online
Once you get the CPI approval notification, your small cell should be ready to go. To check, navigate to the small cell Dashboard and verify that the registration status is approved, and the statuses are all Green.